


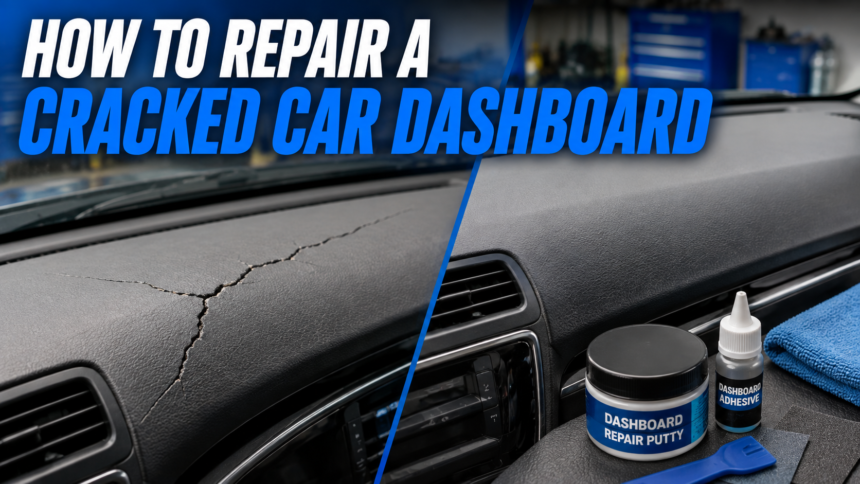
A cracked dashboard is one of the most common problems car owners face as their vehicle ages, especially in hot and sunny climates. The good news is that learning how to repair a cracked car dashboard does not always require a mechanic or a huge budget. With the right tools, a bit of patience, and the correct technique, most cracks can be repaired at home in just a few hours.
- Understanding Dashboard Damage
- Tools & Materials Needed
- Pre-Repair Preparation
- Step-by-Step Repair Process
- Widening and Beveling the Crack
- Applying Adhesive or Filler
- Heat-Setting the Repair
- Sanding for a Smooth Finish
- Matching the Texture
- Color-Matching and Painting
- Applying a Protective Clear Coat
- Curing & Aftercare
- Alternative Solutions
- Common Mistakes to Avoid
- Cost Comparison
- Frequently Asked Questions
- Conclusion
- Related Articles
This guide walks you through everything from understanding why dashboards crack to applying the final protective coat, so you can restore your dashboard’s look without spending money on a full replacement.
Understanding Dashboard Damage
Before starting any repair, it helps to understand what kind of damage you are dealing with and why it happened in the first place. This section explains the common crack types and dashboard materials so you can choose the right fix.
Types of Cracks
Dashboard cracks generally fall into a few categories: hairline cracks that are thin and shallow, deep cracks that go through most of the material, spiderweb cracks that spread outward from one point, and split seams where two panel sections separate. Identifying which type you have determines whether a simple filler will work or if you need a more advanced repair kit.
Dashboard Materials
Most modern dashboards are made from vinyl-covered ABS plastic or polyurethane foam with a vinyl skin, while older vehicles often use solid hard plastic. Vinyl-covered dashboards flex slightly and are usually repaired with heat-set kits, while solid plastic dashboards respond better to epoxy-based fillers. Knowing your dashboard’s material helps you buy the correct repair product.
How to Assess Crack Severity
Run your finger gently along the crack to feel its depth and check if it moves when you press the dashboard lightly. Shallow, stable cracks are easy DIY fixes, while deep cracks near vents, airbags, or structural mounts may need professional attention. Taking a few minutes to properly assess the damage prevents wasted time and materials.
Tools & Materials Needed
Having the right supplies ready before you start saves time and gives a cleaner result. Below is a table summarizing what most repairs require, followed by extra details for each category.
| Category | Items Needed |
| Repair Kit | Heat-set vinyl repair kit, epoxy filler kit, or flexible plastic filler |
| Supporting Tools | Heat gun, fine sandpaper, rotary tool, texture mat or texture stamp |
| Safety Gear | Nitrile gloves, dust mask, safety glasses |
Repair Kit Options
Heat-set vinyl kits work well for flexible dashboards because the adhesive bonds and cures under heat, matching the material’s natural flex. Epoxy kits are better suited for rigid plastic dashboards since they harden into a solid, sandable surface. Flexible fillers sit between the two and are a good general-purpose choice for beginners.
Supporting Tools
A heat gun is essential for activating heat-set adhesives and softening the surrounding material for a smoother blend. Sandpaper in multiple grits helps you level the repair without damaging the original texture, while a rotary tool is useful for widening deep cracks before filling. A texture mat recreates the dashboard’s grain pattern so the repair blends in naturally.
Safety Gear
Gloves protect your skin from adhesives and epoxy chemicals that can irritate the skin on contact. A dust mask is important when sanding, since plastic dust can be harmful if inhaled repeatedly. Safety glasses prevent debris or filler particles from getting into your eyes during sanding or heat application.
Pre-Repair Preparation
Preparation directly affects how well the repair holds and how invisible it looks once finished. This stage focuses on cleaning and protecting the work area before any filler touches the crack.
Cleaning the Dashboard Surface
Wipe the entire crack area with isopropyl alcohol to remove dust, oils, and old cleaning product residue. A clean surface allows the filler or adhesive to bond properly instead of sitting on top of grime. Let the area dry completely before moving to the next step.
Removing Loose Material
Gently pick out any loose plastic fragments or flaking vinyl along the crack edges using tweezers or a small pick. Leaving loose debris inside the crack can cause the filler to sit unevenly or crack again later. This step only takes a few minutes but greatly improves the final result.
Masking Off Surrounding Areas
Use painter’s tape to outline the repair zone so filler, texture spray, or paint doesn’t spread onto the clean parts of the dashboard. This keeps your workspace controlled and reduces cleanup time afterward. It also creates sharper, more professional-looking edges once the tape is removed.
Step-by-Step Repair Process
This is the core part of learning how to repair a cracked car dashboard, where preparation turns into an actual fix. Each step should be done in order for the best results.
Widening and Beveling the Crack
For deep cracks, use a rotary tool to slightly widen the opening and create a beveled edge on both sides. This gives the filler more surface area to grip onto, making the bond significantly stronger. Skip this step only if the crack is a thin hairline type.
Applying Adhesive or Filler
Apply your chosen filler directly into the crack using the applicator provided in your kit, slightly overfilling the area. Overfilling accounts for shrinkage during curing and gives you material to sand down later. Work in small sections if the crack is long, so the filler doesn’t dry unevenly.
Heat-Setting the Repair
If you’re using a heat-set vinyl kit, apply controlled heat with a heat gun to activate and cure the adhesive as instructed on the product. Keep the heat gun moving to avoid scorching the material, and follow the manufacturer’s recommended distance and timing. This step is what gives vinyl repairs their flexible, long-lasting bond.
Sanding for a Smooth Finish
Once the filler has cured, sand it down starting with a medium grit and finishing with a fine grit, such as 600, for a smooth surface. Sand in light, even strokes and check frequently so you don’t remove too much material. The goal is a surface that feels level with the surrounding dashboard.
Matching the Texture
Use a texture mat or texture spray to recreate the dashboard’s grain pattern over the smoothed filler before it fully sets. This step is what makes a repair blend in rather than looking like an obvious patch. Practice on a scrap piece first if your kit includes one.
Color-Matching and Painting
Apply a vinyl or plastic-specific colorant that matches your dashboard’s exact shade, building up thin coats rather than one thick layer. Thin coats dry more evenly and reduce the risk of visible brush or spray lines. Allow each coat to dry fully before adding the next.
Applying a Protective Clear Coat
Finish with a clear protective coat in a matte or satin finish that matches your dashboard’s original sheen. This layer shields the repair from UV rays and daily wear, extending how long the fix lasts. Let it cure fully before touching the area.
Curing & Aftercare
Proper curing and aftercare determine whether your repair lasts for years or fails within weeks. This section covers what to do immediately after finishing the repair.
Recommended Curing Time
Most repair products need anywhere from a few hours to 24 hours to fully cure, depending on the brand and climate. Always check the product label rather than guessing, since rushing this stage is one of the most common repair mistakes. Avoid placing anything on the dashboard during this period.
Avoiding Sunlight and Heat Exposure
Keep the vehicle parked in shade or a garage for at least the first day after completing the repair. Direct sunlight and high heat can cause uncured filler or paint to soften, shift, or discolor. Using a windshield sunshade during this period offers extra protection.
Safe Cleaning Products
Once fully cured, clean the repaired area only with mild, dashboard-safe cleaners rather than harsh chemical wipes. Alcohol-based or abrasive cleaners can wear down the new paint and clear coat faster than normal use. A soft microfiber cloth is usually enough for regular maintenance.
Alternative Solutions
Not every situation calls for a hands-on repair, so it’s worth knowing the other options available. This section briefly compares covers, professional help, and replacement.
Dashboard Covers or Caps
A dashboard cover or cap simply fits over the existing dashboard to hide cracks without any repair work at all. This is a fast, low-cost option, though it doesn’t fix the underlying damage. It works best as a temporary or budget-friendly solution.
Professional Repair Services
Auto interior specialists have access to professional-grade tools and color-matching systems that can produce a near-invisible repair. This option costs more than DIY but suits severe damage or dashboards with airbag components nearby. Many shops complete the job within a single day.
Full Dashboard Replacement
Replacement is usually only necessary when the dashboard has multiple large cracks, structural damage, or safety-related issues around the airbag housing. It is the most expensive route but guarantees a factory-fresh result. For most single or moderate cracks, repair remains the more practical choice.
Common Mistakes to Avoid
Many DIY repairs fail not because of the product used, but because of small preparation or process errors. Below are the most frequent mistakes people make.
| Mistake | Why It Causes Problems |
| Skipping surface prep | Filler doesn’t bond properly and peels later |
| Wrong filler type | Rigid filler on flexible vinyl cracks again |
| Rushing curing time | Paint or texture shifts and looks uneven |
Avoiding these three mistakes alone significantly improves the success rate of any dashboard repair project, whether you’re a first-timer or have done similar fixes before.
Cost Comparison
Understanding the price difference between options helps you decide which route fits your budget. DIY repair kits typically range from affordable to moderately priced and cover most small to medium cracks.
Professional repair services cost more due to labor and specialized equipment but deliver a more polished finish. Full replacement is by far the most expensive option since it involves the part cost plus installation labor, making it a last resort rather than a first choice for most drivers.
Frequently Asked Questions
Can I repair a cracked dashboard without removing it? Yes, most repair kits are designed for in-place use, so removing the dashboard is rarely necessary for standard cracks.
How long does the repair last? A properly done repair with quality materials can last several years under normal driving conditions and sun exposure.
Will the repair be visible? With correct texture matching and color blending, most repairs become very difficult to notice, especially from normal viewing distance.
Can I repair a leather-wrapped dashboard the same way? Leather-wrapped dashboards need leather-specific repair kits rather than vinyl or plastic products, since the material behaves differently.
Conclusion
Knowing how to repair a cracked car dashboard gives you a practical, budget-friendly alternative to costly replacement.
By properly assessing the damage, gathering the right tools, and following each step carefully from cleaning to the final clear coat, most drivers can achieve results that look close to factory quality.
For minor to moderate cracks, a DIY approach saves both time and money, while severe damage may still call for professional help or replacement.
Related Articles
How Old to Rent a Car in Texas? Complete Age Requirements Guide
How Many Engine Mounts Does a Car Have?
Brake Pedal Locked and Car Won’t Start? Here’s Why
What Is Neutral For in a Car? Complete Guide for Every Driver